
Gaining root
Solder 3 contacts GND, RX, TX to UART:
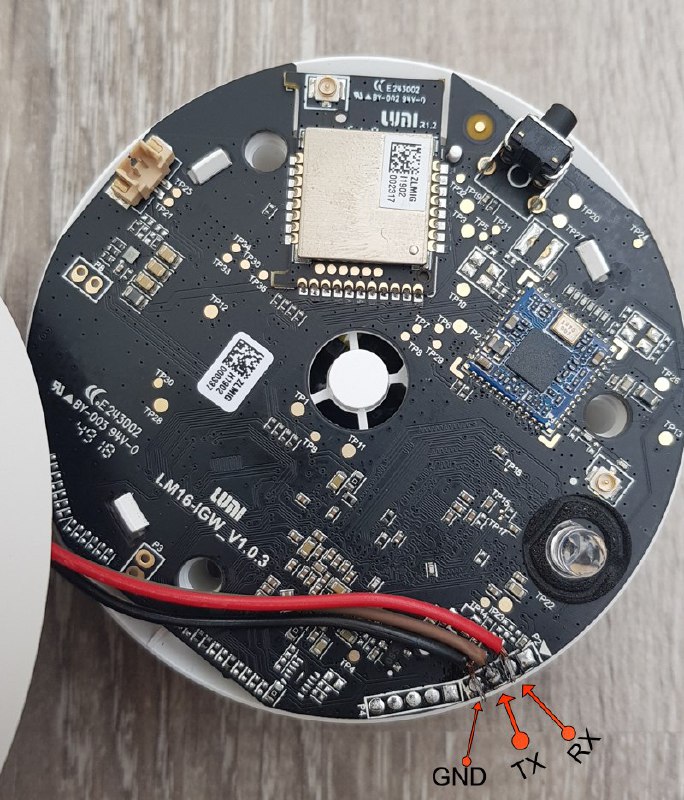
Then connect UART 2 USB adapter. If you don’t have UART2USB adapter, use any Arduino with CH340 with jumper cables. To use serial console while booting, you
can use minicom/picocom on Linux or PuTTY on Windows. Use baudrate 115200.
Stop booting by pressing any key in the uart terminal right after powering the
device. If it not stops with prompt => you should reboot the gateway by
plugging it off and then on.
Prepare a new password for the root user. It can be blank, but you have to confirm it after setting it in the console.
Enter the following line and boot will start:
setenv bootargs "${bootargs} single rw init=/bin/bash" && boot
As an alternative, if your terminal input displays weird characters, use sh instead of bash
setenv bootargs "${bootargs} single rw init=/bin/sh" && boot
After booting to linux bash console, enter:
passwd
Enter the prepared password 2 times. In case of an empty password, you have to press enter one more time to confirm it.
In case your password change is failing over and over again due to mismatched passwords - change it with following oneliner:
usermod --password $(echo NEW_PASSWORD | openssl passwd -1 -stdin) root
NOW YOUR GATEWAY HAS ROOT
Newer firmwares can provide init script with disabled shell login on the normal start and display this message:
INIT: no more processes left in this runlevel
Enable getty on serial console. If you have an older firmware, you can run this command as well, it will run as no-op.
sed -i "s/#mxc0/mxc0/" /etc/inittab && sync
To enable ssh server on the gateway add the following line at the end of
/etc/rc.local before the /home/root/fac/fac_test line:
/etc/init.d/dropbear start &
Now you can reboot and connect to your gateway at *GATEWAY_IP*, port 22.
If you receive an error:
Starting Dropbear SSH server: Pseudo-terminal will not be allocated because stdin is not a terminal.
ssh: connect to host rsa port 22: Connection refused
It means that your dropbear is compiled without ssh-server support and can serve only as a client. Replace it with a fully functional ssh-server:
mv /usr/sbin/dropbearmulti /usr/sbin/dropbearmulti.backup
echo -e "GET /openlumi/openlumi.github.io/master/files/dropbearmulti HTTP/1.0\nHost: raw.githubusercontent.com\n" | openssl s_client -quiet -connect raw.githubusercontent.com:443 -servername raw.githubusercontent.com 2>/dev/null | sed '1,/^\r$/d' > /usr/sbin/dropbearmulti
chmod +x /usr/sbin/dropbearmulti
Setting Wi-Fi without Mi Home app.
You can omit this section in case the gateway is already connected using Mi Home application.
After rebooting, the gateway enables the testing console.
To exit to normal login mode, type exit_factory, then press enter.
Then log in to the console with the user root and password you have set.
How gateway enables Wi-Fi
While booting, gateway while executing rc.local it runs the lines:
/home/root/set_mac.sh &
/lumi/app/miio/wifi_start.sh > /dev/null 2>&1 &
Those lines check for the file /lumi/conf/wifi.conf and if it is absent,
it starts an open Wi-Fi Access Point.
Creating Wi-Fi config
Run the following lines with your own Network name and password.
Keep key_mgmt as is:
echo 'ssid="lao_mao"' > /lumi/conf/wifi.conf
echo 'psk="12345678"' >> /lumi/conf/wifi.conf
echo 'key_mgmt=WPA' >> /lumi/conf/wifi.conf
Also, you can use vi editor to set Wi-Fi credentials:
vi /lumi/conf/wifi.conf
Press i, then paste
ssid="lao_mao"
psk="12345678"
key_mgmt=WPA
Then exit with saving: (Press Esc, then type :qw and press Enter)
To check the config is correct you can manually run the lines
from /etc/rc.local:
/lumi/app/miio/wifi_start.sh
You will see the connection process. Press ctrl+c after you got the info
if the device is connected or not.
If the Wi-Fi credentials are set correctly, ifconfig will show IP address
of the gateway.